
What you see
Beyond the Rift you cross four areas, one after the other: where you land, a room with a battery under a cage of bars and a hanging lift, two towers, and a shaft with a twisting tunnel. Each ends at a gate held open by two chains or two monkey bars, and a teleporter takes you on. The game saves when you reach each new area, but only the first one is in the checkpoint menu.
How it works
- Webs (stringy nets) block the way, and goop bounces off them. Only the Hook Gun player can pull one down; it stays down.
- Rift glass comes in pairs. Hold Interact at a pane for 0.7 s and you step out of its pair. It takes one of you at a time. Goop fired into a pane flies out of its pair.
- Gates open when two things are held at the same time: two chains, two monkey bars, or one of each. A chain takes a hand or a hook and springs back when let go. A monkey bar needs a player hanging on it: the hook can't hold it. Once both are held, they lock and the gate stays open.
- A battery starts empty. It takes Energy or Ghost in two ways: the Goop Gun player fires goop charged at a source into it, or the Hook Gun player puts one hook on the battery and the other on a source. Recalling the goop, or letting go of the hooks, empties it again.
- Energy comes from the energy plants, Ghost from the ghost sources. The Goop Gun player can carry several charges and switch between them.
- Some jellyfish walls are wired to a battery instead of a gate: they open only while the battery holds Ghost, and close again as soon as it loses it.
- Lifts follow their battery: Energy and Ghost move them the same way, an empty battery sends them back.
- Holes in the floor and rings in the ceiling are teleporters: walk in and you come out in the next place.
Say which pin you're at. Before anyone recalls goop or lets go of a hook, check that nobody still has to get through a wall wired to the battery.
Maps
One map per area, top view with the roof cut away, north up. A number means the same thing on every map; rift glass panes carry a letter, and the same letter marks both panes of a pair.
Where you land
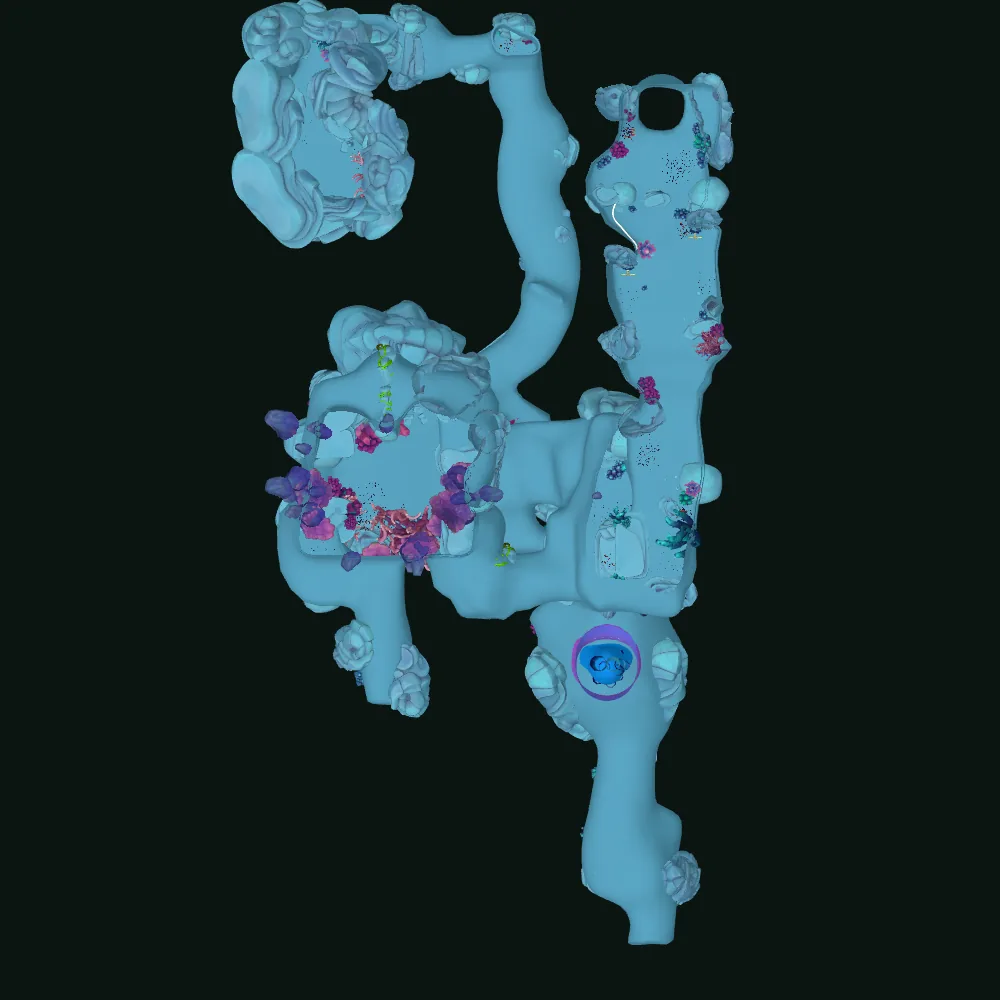 1234566785 m
- 1Start room
- 2Rift glass at the end of the south corridor
- 3Its pair, in the upper west wing
- 4Web across the upper walkway: pull it
- 5Web north of the hall: not on the way
- 6The two chains
- 7Jellyfish wall
- 8Pit with the teleporter to the next room
The battery under the cage
The game saves when you arrive here.
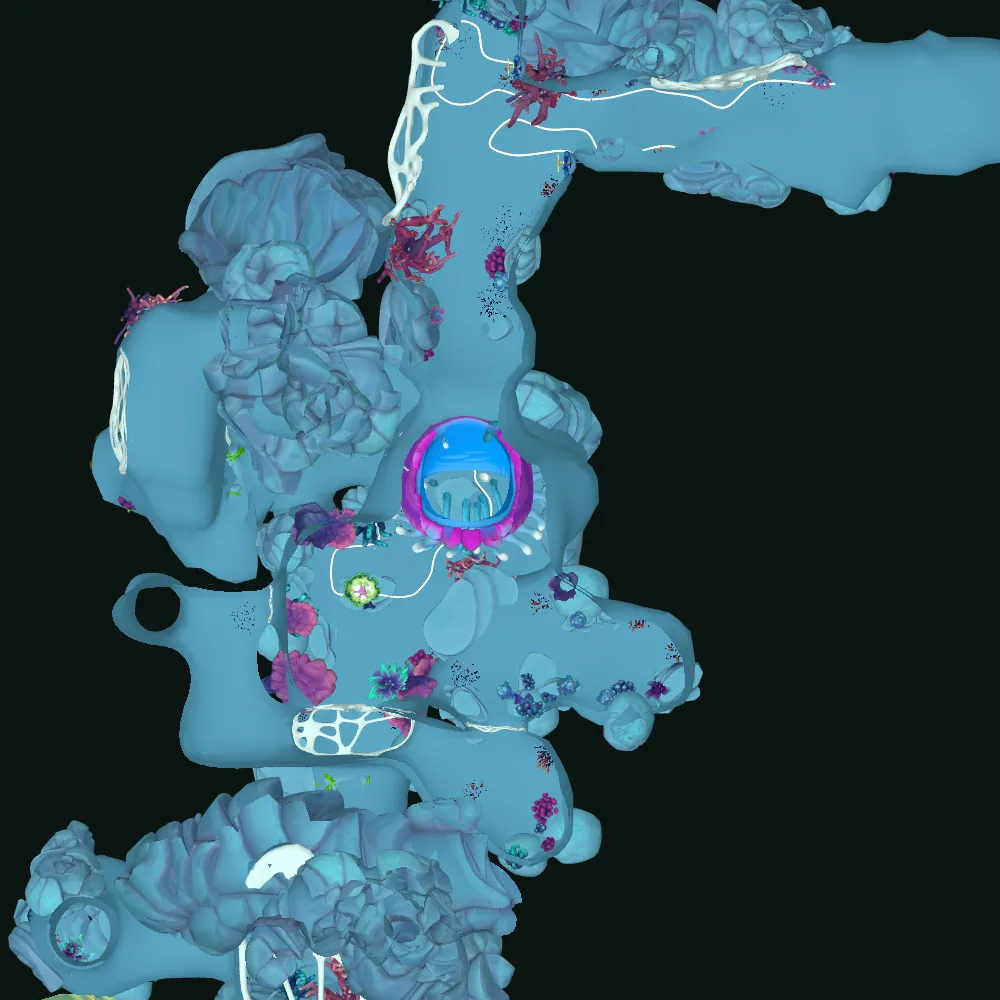 91011111213141516171819202121222324255 m
- 9Where you arrive
- 10Web across the corridor: pull it
- 11Webs in front of the ghost source: pull them
- 12Ghost source
- 13Battery under the cage of bars
- 14Jellyfish wall wired to the battery, beside the lift
- 15Hanging lift
- 16Energy plant on the south-east ledge
- 17Web into the west room
- 18Web on the floor, over a hole
- 19Ceiling ring the hole drops you out of
- 20High web in a window
- 21The two chains
- 22Jellyfish gate to the east tunnel
- 23Hole to the two towers
- 24Ceiling ring to the shaft
- 25Where you come back from the towers
Tower A (south): ground floor
The game saves when you arrive here.
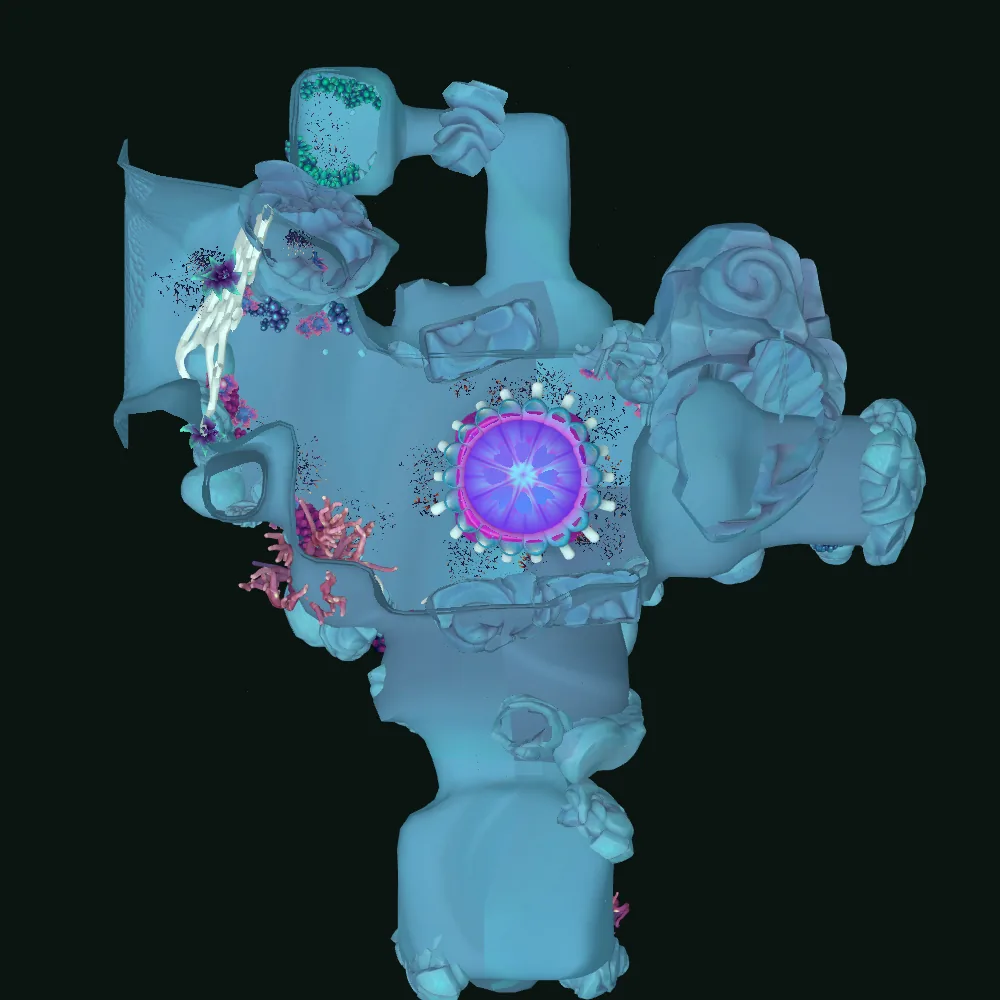 262731323738AB5 m
- 26Start
- 27Ghost source
- 31Lift
- 32Hole to the other tower
- 37Gate on the ground floor
- 38Exit hole
- AGround floor: tower A north side ↔ tower B south side
- BGround floor: tower A south side ↔ tower B north side
Tower A (south): second and third floors
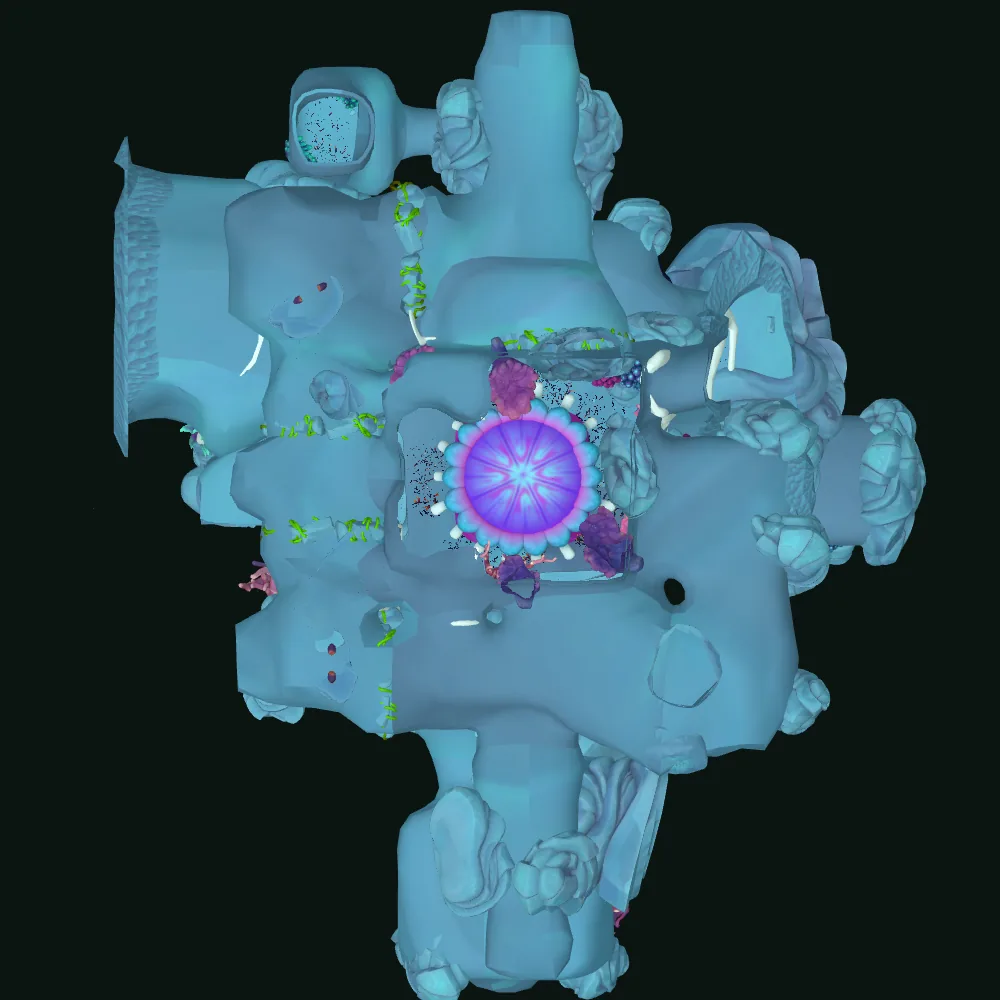 293333343539CDEF5 m
- 29Energy plant
- 33Monkey bars of the middle wall
- 34Middle wall
- 35Monkey bars of the end gate (third floor), right over the hatch (36)
- 39Where the pit at 30 brings you
- CSecond floor: tower A north side ↔ tower B south side
- DSecond floor: tower A east side ↔ tower B west side
- ESecond floor: tower A south side ↔ tower B north side
- FThird floor: tower A west side ↔ tower B east side
- Other webs
Tower B (north): ground floor
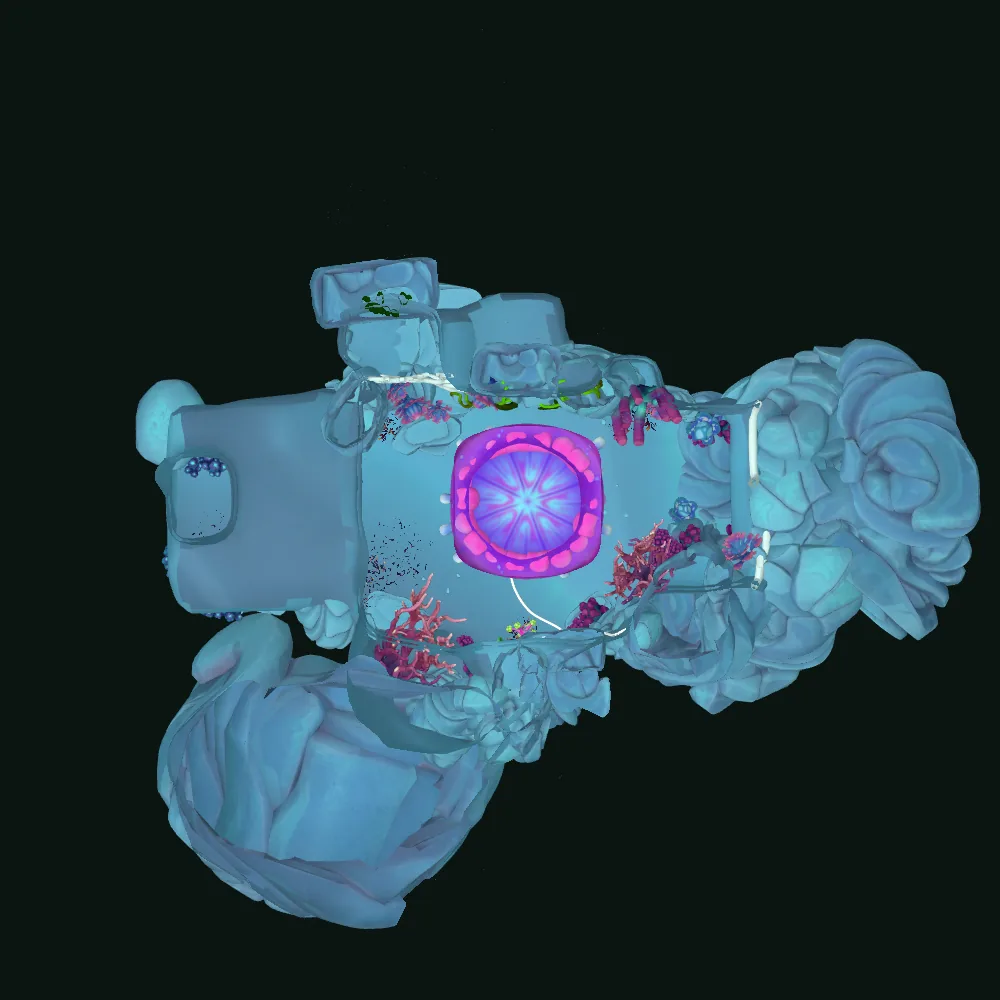 28293032AB5 m
- 28Battery
- 29Energy plant
- 30Jellyfish wall wired to the battery, over a pit (the pit takes you to 39)
- 32Hole to the other tower
- AGround floor: tower A north side ↔ tower B south side
- BGround floor: tower A south side ↔ tower B north side
- Other webs
Tower B (north): second and third floors
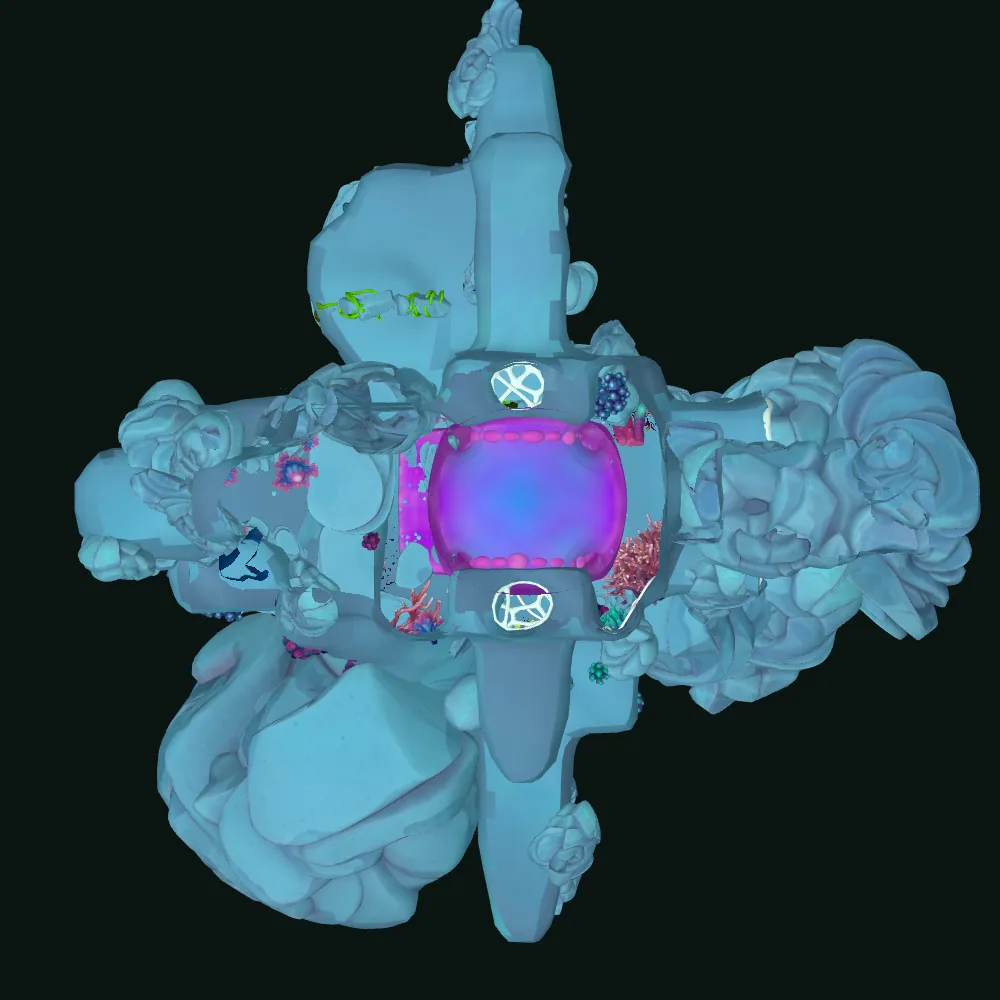 31CDEF5 m
- 31Lift
- CSecond floor: tower A north side ↔ tower B south side
- DSecond floor: tower A east side ↔ tower B west side
- ESecond floor: tower A south side ↔ tower B north side
- FThird floor: tower A west side ↔ tower B east side
- Other webs
The shaft with the twisting tunnel
The game saves when you arrive here.
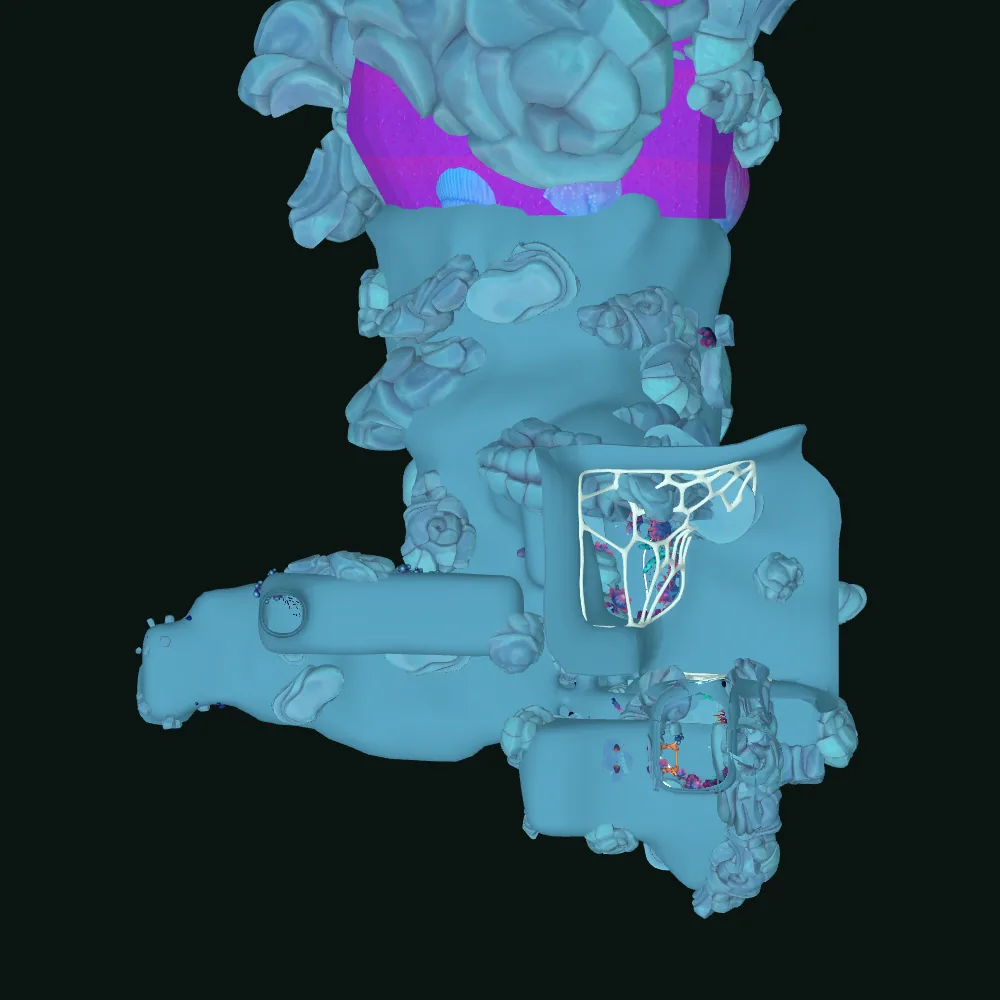 404142424344454647485 m
- 40Where you land
- 41Battery
- 42Energy plant
- 43Ghost source, at the mouth of the tunnel
- 44Web, and the jellyfish wall wired to the battery behind it
- 45Twisting tunnel
- 46The two monkey bars
- 47Gate
- 48Teleporter to 7-2
Solution
Show hint
Every area has the same shape: open the way with webs and a battery, then hold the two things at the gate together.
When a wall wired to the battery closes again, the battery has lost its Ghost: someone recalled the goop or let go of a hook.
Show the answerSpoiler
Where you land
1. From the start room (1), take the tunnel. It bends south and down into a large hall. Keep going south down the long corridor to the rift glass at its end (2).
2. Each of you holds Interact at the pane, one after the other. You come out of its pair (3) in the upper west wing, above the hall.
3. Hook Gun player: pull down the web across the walkway east of you (4). The web north of the hall (5) isn't on the way.
4. Follow the upper walkway east, then north up the long east corridor to the two chains (6). Hold one each at the same time (the Hook Gun player can hold theirs with the hook). The jellyfish wall (7) opens for good.
5. Drop into the pit behind it (8).
The battery under the cage
6. You arrive at the south-west end (9). Hook Gun player: pull the web across the corridor north-east of you (10).
7. In the hall: the battery under its cage of bars (13), the lift hanging above the floor north-east of it (15) and a jellyfish wall wired to the battery beside the lift (14). Hook Gun player: pull the two webs in front of the ghost source in the east alcove (11, 12).
8. Put Ghost in the battery. Goop Gun player: charge goop at the ghost source and fire it into the battery. Or Hook Gun player: one hook on the ghost source, one on the battery. The wall beside the lift opens and the lift comes down 3.3 m.
9. Both of you climb onto the lift from where the wall was.
10. Now empty the battery: the Goop Gun player aims at the goop in it and recalls it (or the Hook Gun player lets go). The lift goes back up and you step off on the upper floor to the north.
11. Hold the two chains there at the same time (21). The jellyfish gate to the east (22) opens and a wall closes behind you, between you and the lift.
12. Follow the east tunnel to the hole (23): it takes you to the two towers.
The west room behind web 17 has a web on its floor (18) over a hole that drops you out of a ceiling ring (19) above the south-east ledge, next to the energy plant (16). Web 20 is a high window. The steps above don't use them.
Not in the game files: That the lift, once back up, is how you get onto the upper floor: the files give its travel and the floor heights, not the climb.
The two towers
13. You start on the ground floor of tower A (26), the south tower. The ghost source (27) is next to you; the battery (28) is on the ground floor of tower B, the north tower.
14. Goop Gun player: charge Ghost at the ghost source and get it into the battery. Carry the charge over, or fire it into a rift glass pane so it flies out of the pane's pair in tower B. The holes on the east side of each ground floor (32) take you to the other tower; rift glass (A to F) links the floors.
15. With Ghost in the battery, the jellyfish wall over the pit in the middle of tower B's ground floor (30) is open and both lifts (31) are up: tower A's by 8.3 m, tower B's by 8 m. Leave the Ghost in.
16. Middle wall: both of you hang on the two monkey bars over the second floor of tower A (33) at the same time. The wall on the east side (34) opens for good.
17. Drop into the pit in tower B (30). You come out on the third floor of tower A (39).
18. Both of you hang on the two monkey bars there (35) at the same time. The hatch in the floor below them (36) and the gate on tower A's ground floor (37) open.
19. Go down through the hatch to the ground floor, south through the gate, and into the hole (38). It takes you back to the room with the caged battery, onto the west ledge of its upper floor (25).
Not in the game files: When you need the middle wall, and which panes and lifts you use between floors: the files list them, not the route that links them.
Back in the room with the caged battery
20. From the west ledge (25), go round the upper floor over the south end of the room to the south-east ledge. The ring in the ceiling above it (24) takes you to the shaft; the energy plant (16) is 8 m to the north.
Not in the game files: How you get up into the ceiling ring. The game's own tip says the Hook Gun player can pull themselves to energized goop.
The shaft with the twisting tunnel
21. You land on a ledge on the west side (40). The gate to the west (47) is shut, and the teleporter (48) is behind it.
22. In the shaft: the battery (41) at its south end, one energy plant beside it and one on a high ledge to the south-east (42), the ghost source (43) at the north end, where the twisting tunnel (45) starts. Inside the tunnel, down is the tunnel wall: you can walk round it.
23. Hook Gun player: pull the web on the east wall (44).
24. Put Ghost in the battery (from the ghost source, with goop or with the hooks). The jellyfish wall behind the web opens while the battery holds Ghost.
25. Go through it and up to the high south-east ledge. Both of you hang on the two monkey bars above the battery (46) at the same time: the gate (47) opens for good.
26. Go back west through the gate to the teleporter (48). It takes you to 7-2, Rama Revealed.
Not in the game files: How the shaft floor, the tunnel and the east side connect.
Common mistakes
- Shooting webs with goop: only the Hook Gun pulls them.
- Both stepping into rift glass at once: it takes one player at a time, each holding Interact.
- Recalling the goop (or letting go of the hooks) while someone still has to pass a wall wired to the battery: it closes at once.
- Thinking Energy is needed for the lifts: Ghost moves them too. Only Ghost opens the walls wired to a battery.
- Pulling a monkey bar with the hook: each bar needs one of you hanging on it.
- Letting go of one chain early: both have to be held at the same moment, then they lock.
Achievement
Through the Looking Glass
Ventured Beyond the Rift
How it unlocks (spoiler)
Unlocks on its own as you walk through the area where you arrive beyond the Rift (7-1 The World Beyond the Rift).
Read from the game files of version 1.1.1 (no guesswork). Something wrong in your game? Tell us and we will check it. Report a problem