
What you see
The Offices of Tomorrow are a block of offices where every room has its own gravity. Walk into a curved ramp and the floor bends up until a wall, or the ceiling, is your floor. Both of you start in the lobby, just inside the entrance.
The way out is the Control Room door at the north end of the lobby. It opens once three things are done: a lever in the upper office, a lever in the east wing, and a button behind a shutter. Behind the door, a lift with two cabins takes you on, one of you in each.
How it works
- Curved ramps change your gravity. It stays changed after the ramp, until you walk back down the same ramp or into another one. Gravity changes for whoever walks in, so the two of you can stand on different floors.
- The two square holes in the lobby floor (8 and 20) are ramps too: walk in and you come out on a wall of the room below, with gravity pulling west.
- The lift button (4) answers only to the Hook Gun, and each hook turns the lift over: from the south wall up to the upper office, or back. A turn takes 12 seconds. Whoever stands on the platform turns with it.
- The slider in the upper office (7) turns the bridge (21) by 90°. The bridge gate opens only while the slider is pushed all the way. The slider stays where you leave it.
- Chain 9 in the east offices opens the double doors in the east wing (11) half a second after it is pulled all the way. The doors shut as soon as it is let go.
- Glass door 1 (14) opens 3 seconds after goop lands on the high target (15) and stays open while the goop is there. From the blue room side, two controls by the doorway (25) open it too: a button for the Hook Gun (open only while hooked) and a goop target.
- The two-handled chain (16) needs both of you pulling. It locks at the end and glass door 2 (17) stays open.
- Chain 19 on the blue ceiling opens the shutter over the final button (22) one second after it is pulled all the way, and closes it when let go. The button stays pressed.
- The levers stay down and the final button stays pressed, so the three can be done in any order. When all three are done, the three lights above the Control Room door come on and the door (23) opens 3 seconds later.
| Room | Gravity pulls | How you get in | What is there |
|---|---|---|---|
| Lobby | Down (normal) | You start here | Entrance chains (2), Control Room door (23) |
| South wall | South | Curved ramp at the lobby's south end (3) | Lift button (4), lift (5) |
| Upper office | Down (normal) | The lift (5) | Lever 1 (6), slider (7) |
| East offices | West | Hole in the lobby floor by glass door 1 (8) | Chain for the double doors (9) |
| East wing | East | Ramp at the east end of the south wall (10) | Double doors (11), goop spot (12), lever 2 (13) |
| Blue room | Down (normal) | Glass door 1 and the stairs down (14) | Two-handled chain (16), glass door 2 (17) |
| Blue ceiling | Up (you walk upside down) | The two ramps past glass door 2 (18) | Chain for the shutter (19) |
| Red office and bridge | West | Hole in the lobby floor south of the Control Room door (20) | Bridge gate (21), final button (22) |
Chain holder: say "open" once the shutter is up. Button player: say "pressed" — then the chain can go. Do the same at the double doors.
Maps
Here walls and ceilings are floors, so each map shows a room the way it looks to someone standing in it, with gravity pulling into the page. A number means the same thing on every map.
LobbyGravity pulls: Down (normal)
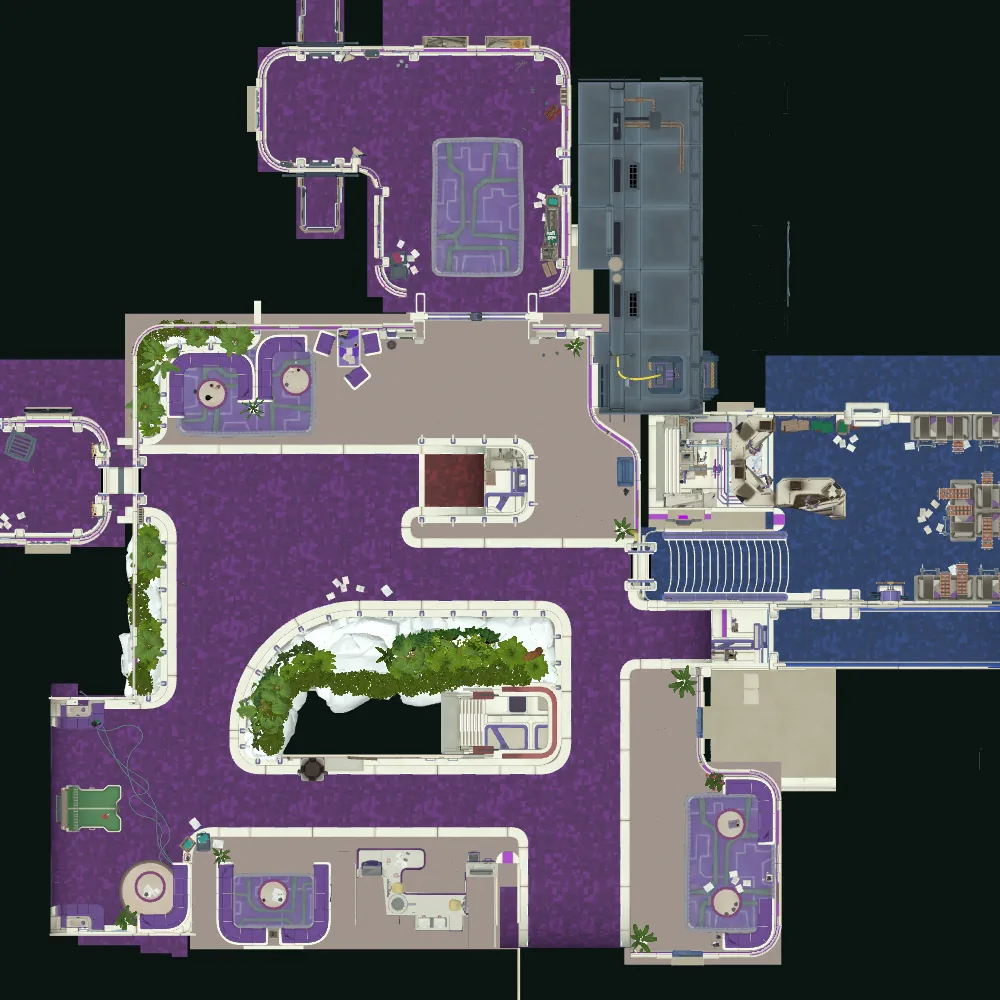 123814151617182023242425255 m
- 1Start: where you both appear
- 2Entrance chains
- 3Curved ramp up onto the south wall
- 8Hole down to the east offices
- 14Glass door 1
- 15High goop target (opens glass door 1)
- 16Two-handled chain
- 17Glass door 2
- 18Ramps up to the blue ceiling
- 20Hole down to the red office
- 23Control Room door
- 24Lift cabins to the Control Room
- 25Doorway controls for glass door 1 (hook button, goop target)
South wallGravity pulls: South
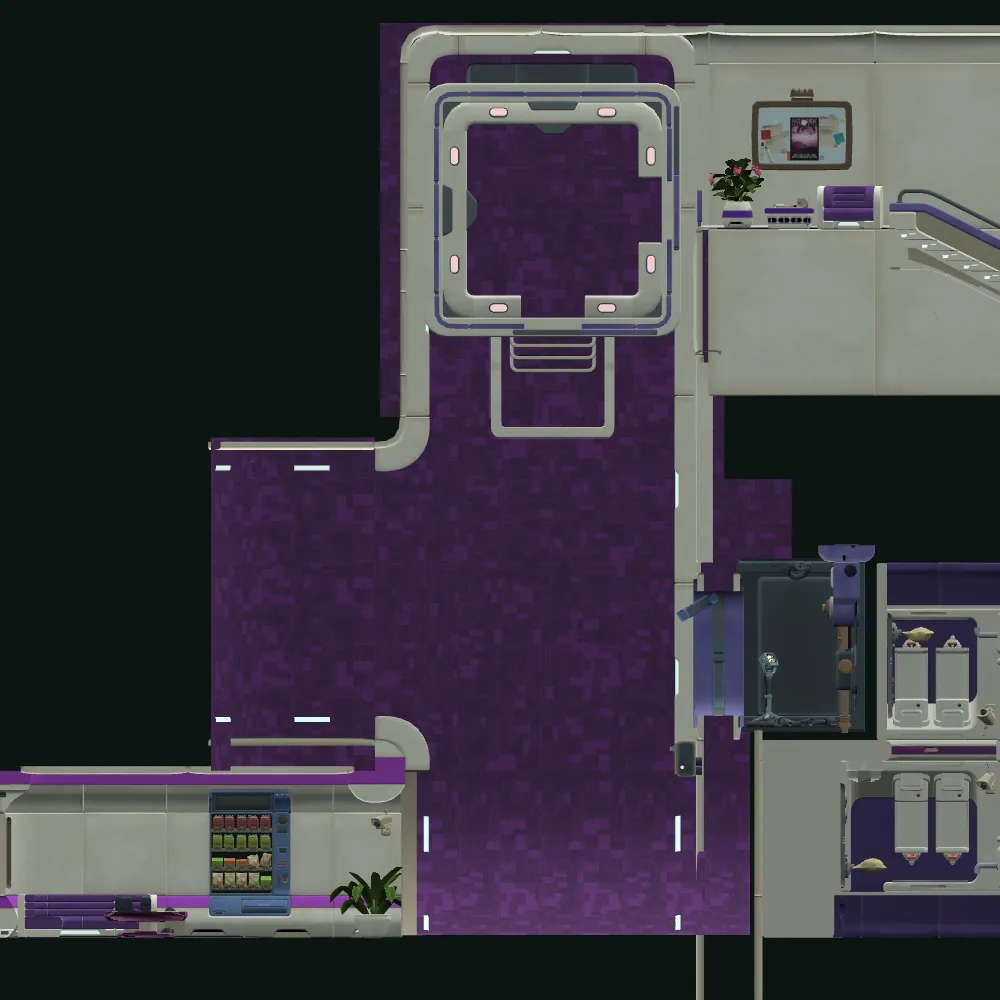 345105 m
- 3Curved ramp up onto the south wall
- 4Lift button (Hook Gun only)
- 5Lift platform
- 10Ramp between the south wall and the east wing
Upper officeGravity pulls: Down (normal)
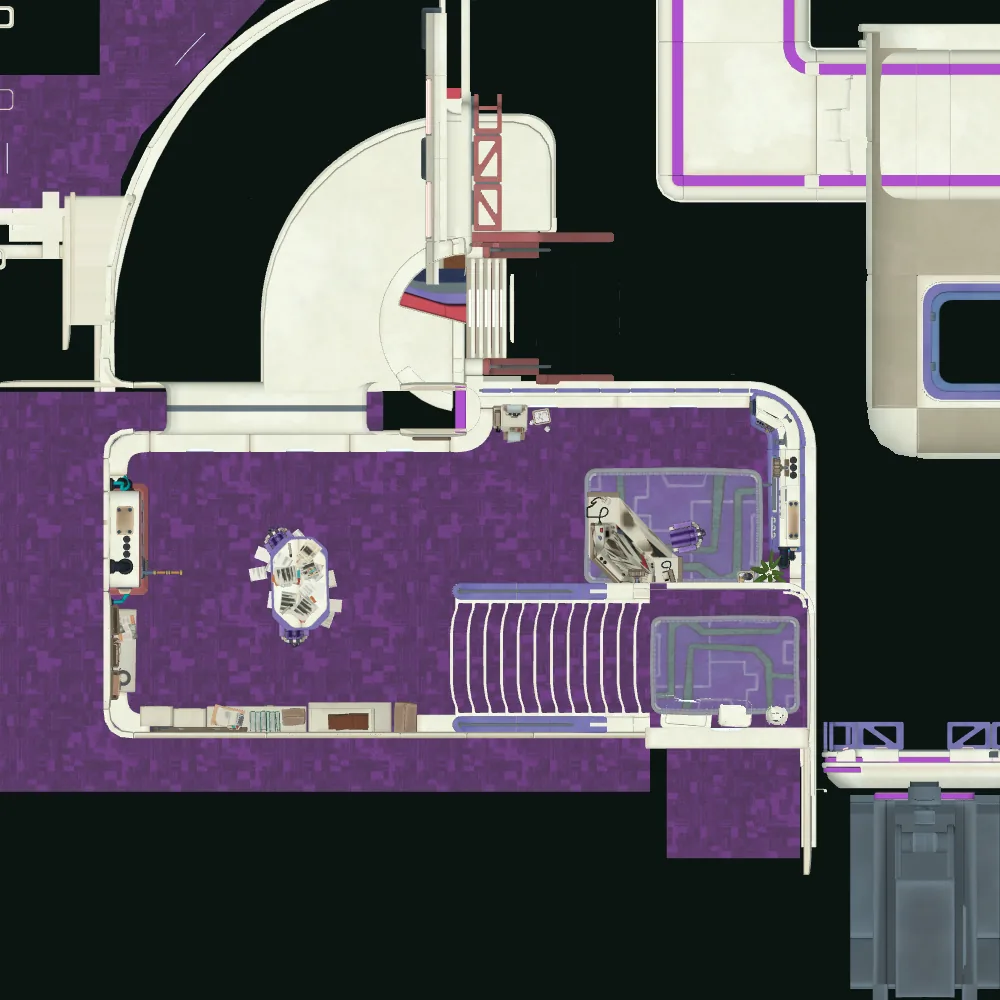 567215 m
- 5Lift platform
- 6Lever 1
- 7Slider (turns the bridge)
- 21Turning bridge and its gate
East officesGravity pulls: West
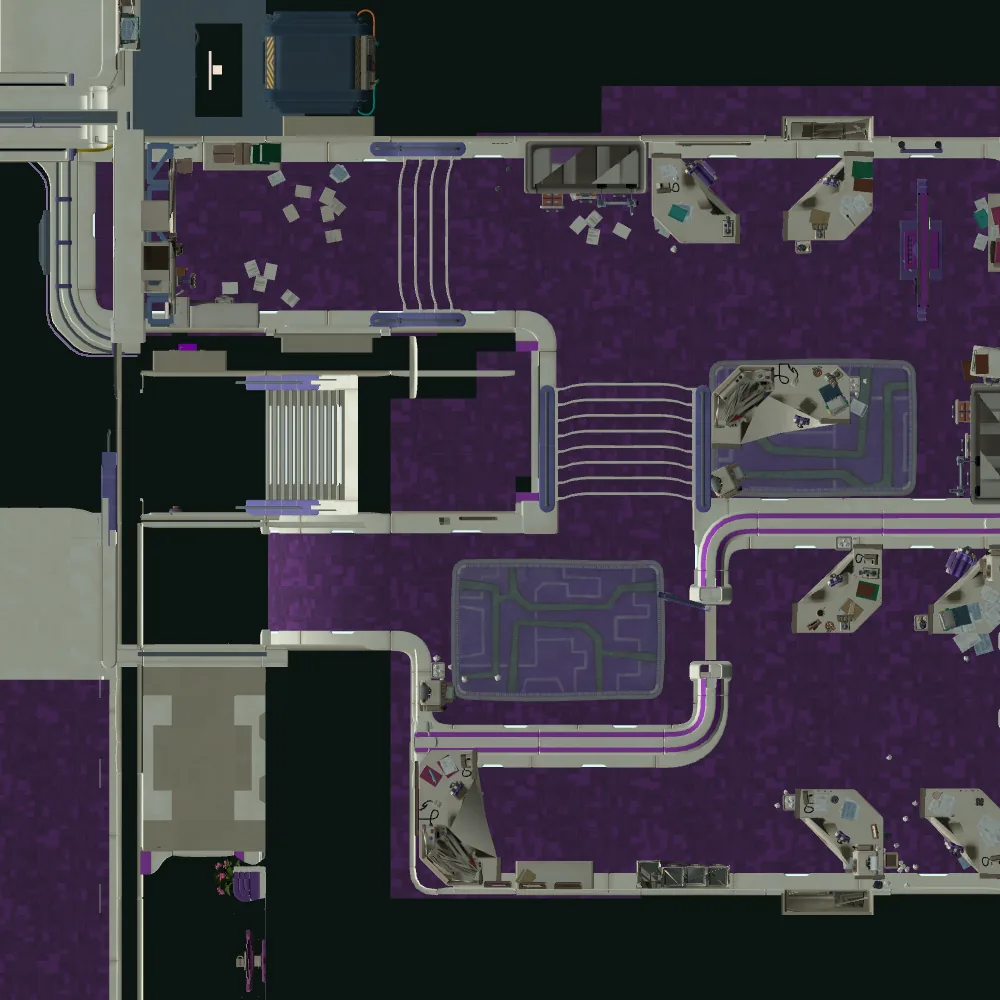 895 m
- 8Hole down to the east offices
- 9Chain for the double doors
East wingGravity pulls: East
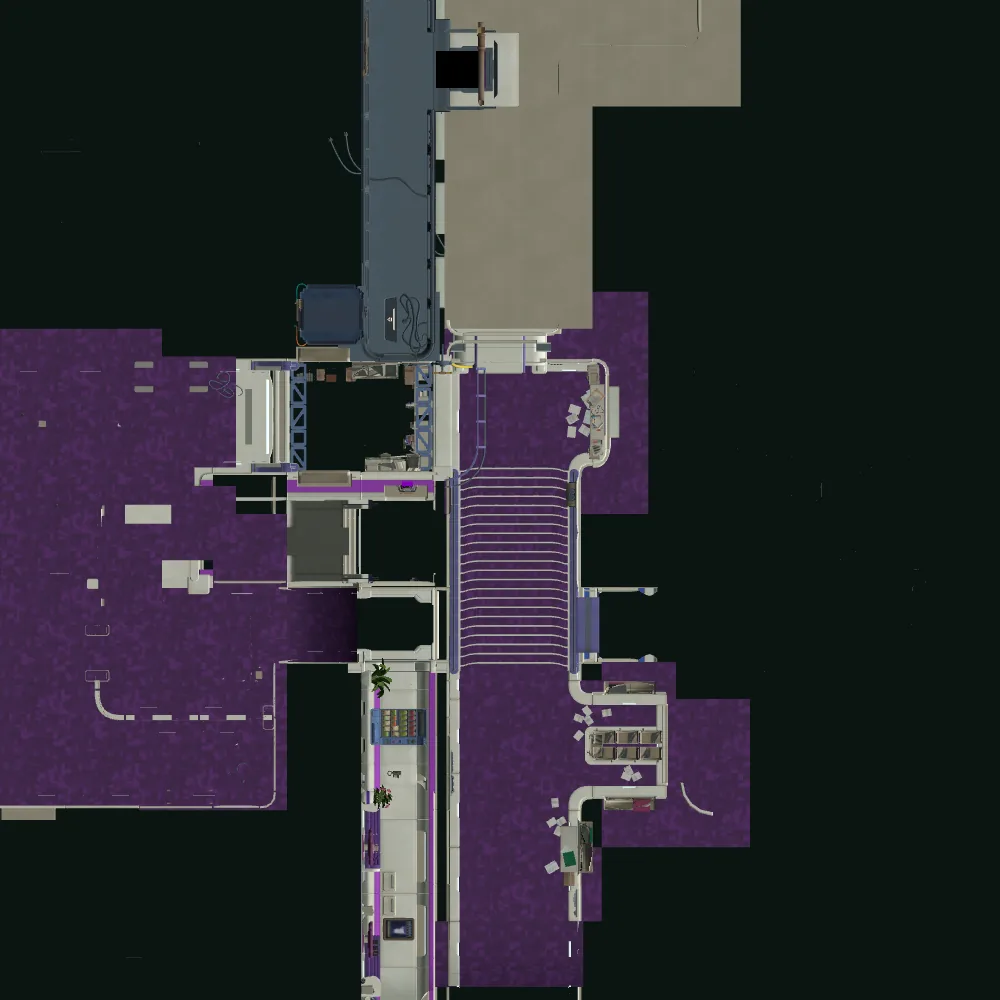 101112135 m
- 10Ramp between the south wall and the east wing
- 11Double doors (open while chain 9 is held)
- 12Goop spot on the wall
- 13Lever 2
Blue ceilingGravity pulls: Up (you walk upside down)
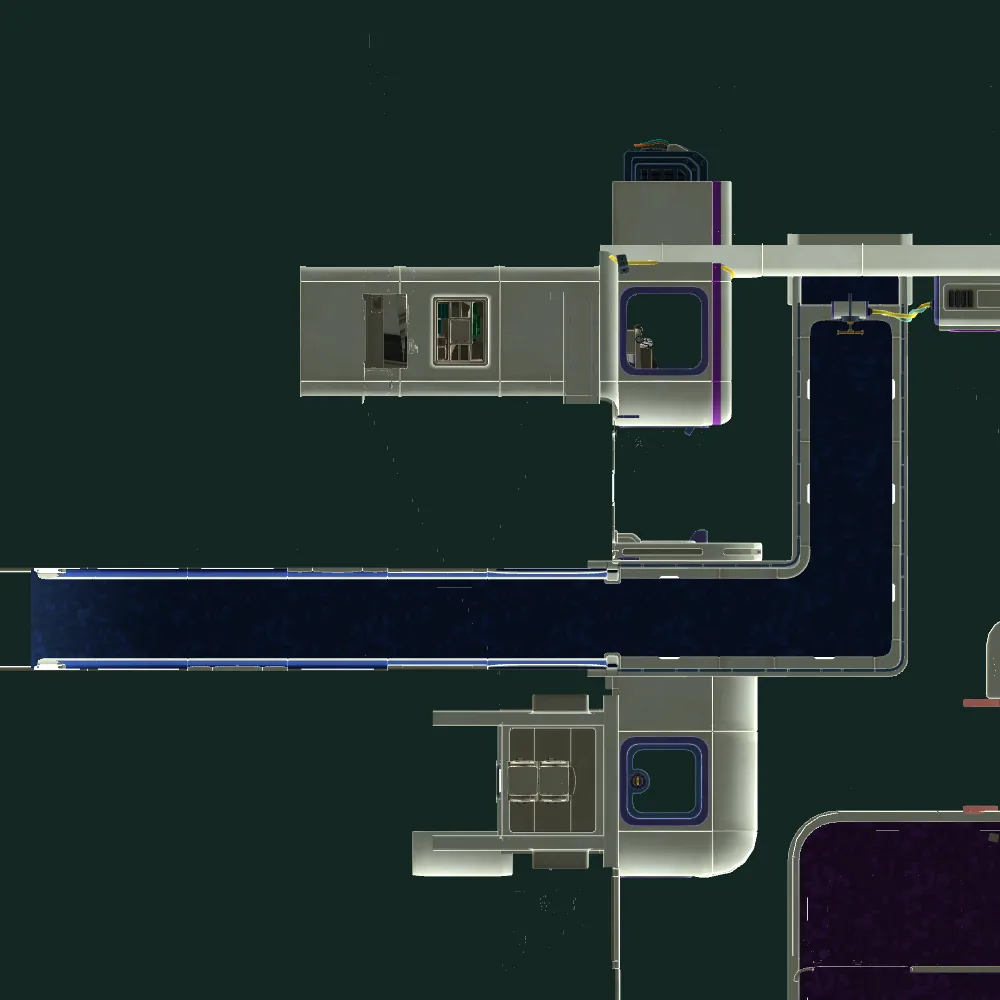 1819225 m
- 18Ramps up to the blue ceiling
- 19Chain for the shutter
- 22Final button, behind the shutter
Red office and bridgeGravity pulls: West
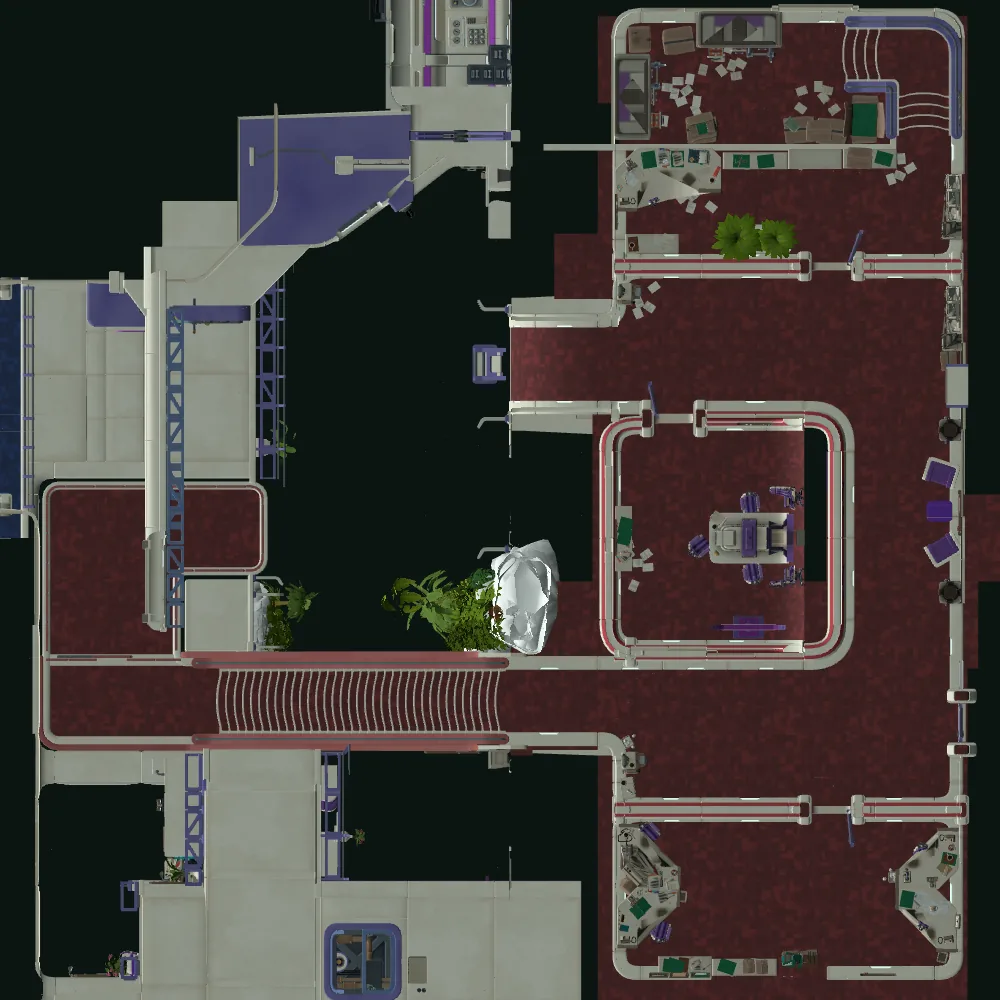 192021225 m
- 19Chain for the shutter
- 20Hole down to the red office
- 21Turning bridge and its gate
- 22Final button, behind the shutter
Solution
Show hint
The Hook Gun player works the lift from the south wall; the Goop Gun player rides it up to lever 1 and the slider.
Lever 2 is high up in the east wing, behind double doors that only stay open while someone holds a chain in the east offices. The final button needs one of you on the blue ceiling holding the shutter chain.
Show the answerSpoiler
If you walked in from the previous area2
Both: pull the two entrance chains (2) at the same time. The glass door stays open. If you loaded this checkpoint, you already start inside (1).
1. Lift to the upper office345
Both: walk to the lobby's south end and into the curved ramp (3). Keep walking: the floor bends up and the south wall becomes your floor.
Goop Gun player: walk up the purple floor to the lift at the top of the south-wall map and up its small steps onto the platform (5).
Hook Gun player: go to the dark panel beside the purple floor and hook the button on it (4). The hook reaches 8 m, so this does not work from the lobby. The lift turns over in 12 seconds and stops level with the upper office's landing.
Not in the game files: The exact spot on the south wall the lift button can be hooked from (it is within 8 m of the dark panel).
2. Lever 1 and the slider6721
Goop Gun player: step off the platform, walk west and down the stairs into the upper office. Pull lever 1 (6) in the north-east corner; it stays down.
Goop Gun player: push the slider (7) on the west wall all the way. The bridge (21) turns and its gate opens. Then walk back onto the platform.
Hook Gun player: once the lift has stopped, hook the button (4) again. The lift turns back and the Goop Gun player steps off on the south wall.
3. Lever 2 in the east wing1011891213
Goop Gun player: on the south wall, walk east into the ramp (10). You come out in the east wing with gravity pulling east. Go down the carpet stairs to the double doors (11).
Hook Gun player: walk back down the curved ramp (3) to the lobby and into the hole by glass door 1 (8). In the east offices, go to the chain (9) and pull it all the way, by hand or with the hook. Keep holding it: the double doors open half a second later and shut when you let go.
Goop Gun player: go through the doors and shoot goop at the marked spot on the wall (12). Climb the goop, then the ledge above it, onto the metal walkway, and pull lever 2 (13). It stays down.
Goop Gun player: come back to the double doors and call for the chain again; go back through, then up the carpet stairs into the ramp (10) and down the curved ramp (3) to the lobby. Hook Gun player: let go of the chain once they are through and come back up the hole (8).
Not in the game files: The way back down from the lever 2 walkway to the double doors.
Not in the game files: What the window that the Hook Gun can pull open from the east wing is for. No step here needs it.
4. Into the blue room15141617
Goop Gun player: from the lobby, shoot goop at the target high on the wall north of glass door 1 (15). The door (14) opens 3 seconds later.
Both: go through glass door 1 and down the stairs into the blue room. Pull the two-handled chain (16) together until it locks. Glass door 2 (17) opens.
5. Shutter and final button181925202122
Goop Gun player: go through glass door 2 (17) and into the ramps (18): the first makes the east wall your floor, the second the ceiling. On the blue ceiling, walk west, then north, to the chain (19). Pull it all the way and keep holding it: the shutter opens one second later.
Hook Gun player: go back up through glass door 1 (14). If it is shut, hook the button beside the doorway (25). In the lobby, walk into the hole south of the Control Room door (20). In the red office, cross to the left of the map and go down the red stairs, through the bridge gate (21), over the bridge and along the walkway to the shutter.
Hook Gun player: when the shutter is open, press the button behind it (22) by hand or with the hook. It stays pressed, so the chain can go.
Either of you can take either job. If you swap, the Goop Gun player leaves the blue room by shooting goop at the target beside the doorway (25).
Not in the game files: Whether the goop on the high target (15) stays when the Goop Gun player shoots goop somewhere else. If glass door 1 is shut, shoot the target again from the lobby or use the doorway controls (25) from inside.
Not in the game files: Whether the Hook Gun player can step through glass door 1 after letting go of the doorway button (25) before the door shuts.
6. To the Control Room2324
The Control Room door (23) opens and the achievement unlocks. Both: walk back to the lobby the way you came, through the door at its north end, and step into the two lift cabins (24), one each.
Either of you can take either cabin. The nearer cabin turns upside down on the way, with its rider; the farther one stays upright.
Common mistakes
- Hooking the lift button from the lobby. It is out of reach there; walk up the curved ramp (3) onto the south wall first.
- Riding the lift together. The lift moves only when its button is hooked, so the Hook Gun player stays on the south wall to send it up and bring it back.
- Pushing the slider only part of the way. The bridge gate opens only with the slider at the very end.
- Letting go of the chain for the double doors (9) too early. The doors shut at once; keep holding until the Goop Gun player is through, both ways.
- Trying the two-handled chain alone. It needs both of you.
- Pressing the final button with the shutter shut, or letting go of the shutter chain before the button is pressed.
- Both getting into the same cabin. You need one in each.
Achievement
Relativity
Explored impossible staircases
How it unlocks (spoiler)
In the Offices of Tomorrow (3-10), the rooms with shifting gravity, pull both levers and press the button: the three steps that open the way on to the Control Room.
Read from the game files of version 1.1.1 (no guesswork). Something wrong in your game? Tell us and we will check it. Report a problem